Building an app and have no idea what stages your app will go under? Don’t worry. We have simply broken down the app building process into eight different stages. Have a read before you start building your app for a smooth app-building journey.
Here are the 8 stages of building an app
1. Ideation stage
Everything starts from an idea in your head but an idea in the head has no worth until it’s worked on. We recommend penning down what you have in your mind. Do some primary research on your idea and try to find out whether your idea is unique and new to the world or it’s already there on the app store. A well planned and researched idea leads to the completion of your app and can lead you to success.
According to the U.S. Bureau of Labor Statistics (BLS), approximately 20% of new businesses fail during the first two years of being open, 45% during the first five years, and 65% during the first 10 years. Only 25% of new businesses make it to 15 years or more. This could be due to a lack of planning, execution or working on a wrong idea. We are sure, you don’t want to be the one among them. So, be wise and plan your project smartly and if you are not sure whether you are going in the right direction, we recommend you find a mentor.
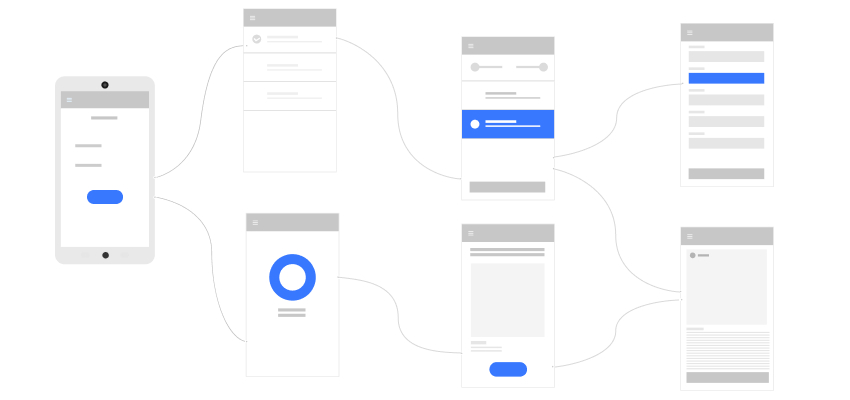
2. Wireframing
Wireframing, yes you read it right. It’s a skeletal of your application and helps you understand how many screens does your app require and the connectivity among them. You can break down wireframing into 3 easy stages.
- Sketch
- Lofi (Low Fidelity) wireframe
- HiFi (Hi Fidelity) wireframe
First, go with the sketch as you can design it your own using your notebook and pen. Then head toward wireframing tools that let you design apps and website wireframes, both LoFi and Hifi. If you are not clear what the LoFi and HiFi wireframes are then go have a read at this article.
3. User journey mapping
A user journey mapping is a visual representation of the customer experience. Build a map for the user’s entire journey (UX) as this will help you build the flawless prototype. It’s one of the most important stages of building an app if you don’t want to rework on your app screens. Be double-sure on every screen and CTA your app user will be following in their entire journey.
It visualizes how a user interacts with a product and allows designers to see a product from a user’s point of view.
4. Prototyping
Want to test your app before fully developing it? Yes, app prototypes help you test your app UI/UX before developing it. This was proved as a game-changer for design agencies, developers and product managers just because of its usability and saves lots of development time and efforts.
A prototype in app development is an early app sample, model, or release of a product built to test a concept or process.
See an app prototype below.
5. Decide your tech stacks
Tech stakes? Yes, you read it right. There are several ways to get your app built. First, decide the platform you want to release your app for whether it’s iOS or Android, a native or cross-platform app? Once you have decided on platforms, you can decide your app development platforms and coding languages. Go, hit the following queries on your favourite search engines to know more about tech stacks required or various kinds of app development.
- Tech stacks for iOS app development
- Tech stacks for Android app development
- Tech stacks for Cross-platform app development
6. Coding
Start coding your application using the preferred integrated development environment (IDE), a desktop-based application that lets you code in supported languages for certain devices. Or go with a cloud-based app builder to get your app built without writing any code.

7. Testing
Want to make your first app launch a success story? Take testing seriously. We recommend you test your application on multiple devices internally and fix the bugs. Once you are done with internal testing go out and ask some people to use your app and give you feedback. Their feedback will help you ensure you release a bug-free product.
8. Releasing on the app store
Once you are done with internal and external testing, now you are ready to release your app to the app store. Releasing an app on the app store is not that difficult but you have to get aligned as per their guidelines. Prepare some catchy content that better describes your product and don’t forget to get some cool screen grabs and a cool video for your users’ understanding. You will have to bear a small fee to release your app on app stores but that’s fair enough.
Take early reviews seriously on app stores and use them to improve your app’s usability as people are more interested in a product free from bugs and should fulfil their purpose of use.
Wrapping up
Nothing is concrete in this very dynamic industry where everyday new concepts and principles take place. But we have tried to bring you down the most advanced and industry fit way of building an app that ensures you don’t waste your time just going blindly. If you just follow the steps given above, we assure you will save a lot of time and money by not doing wrong things. And if you are completely new to the field and don’t have any ideas what these steps mean, we recommend you to go and spend some time studying it or hire a development agency to get this job done for you.


")